
I know those of you who read last week’s Mend-It Monday post will be desperate to see some actual mending with those lovely tools that I showed you, just as I was really keen to have a go with them. But first I needed something to mend… and what better than the most mended garment that I own? My favourite ancient cardigan. For this repair, I decided to give the Speedweve its first outing. I assembled my tools (including the obligatory cup of tea) and settled down to learn the technique.

I decided to use some cotton yarn from my scrap collection: cream for the warp and grey for the weft. Of course you can use the same colour for both directions, or make fancy tartan patterns if you wish, but as a beginner, I thought that two clearly different colours would make it easier for me to see what I was doing.
To begin with you place the wooden disk behind the area than needs mending. This is secured with an elastic band, then the metal part with the hooks is slipped into place on top of the fabric, against the disk and held firm with another elastic band. After that, the warp threads are created. You start by securing a thread at one corner of the area to be covered with the weaving and work your way up and down – stitching in place at the bottom and putting the thread round the hooks at the top.

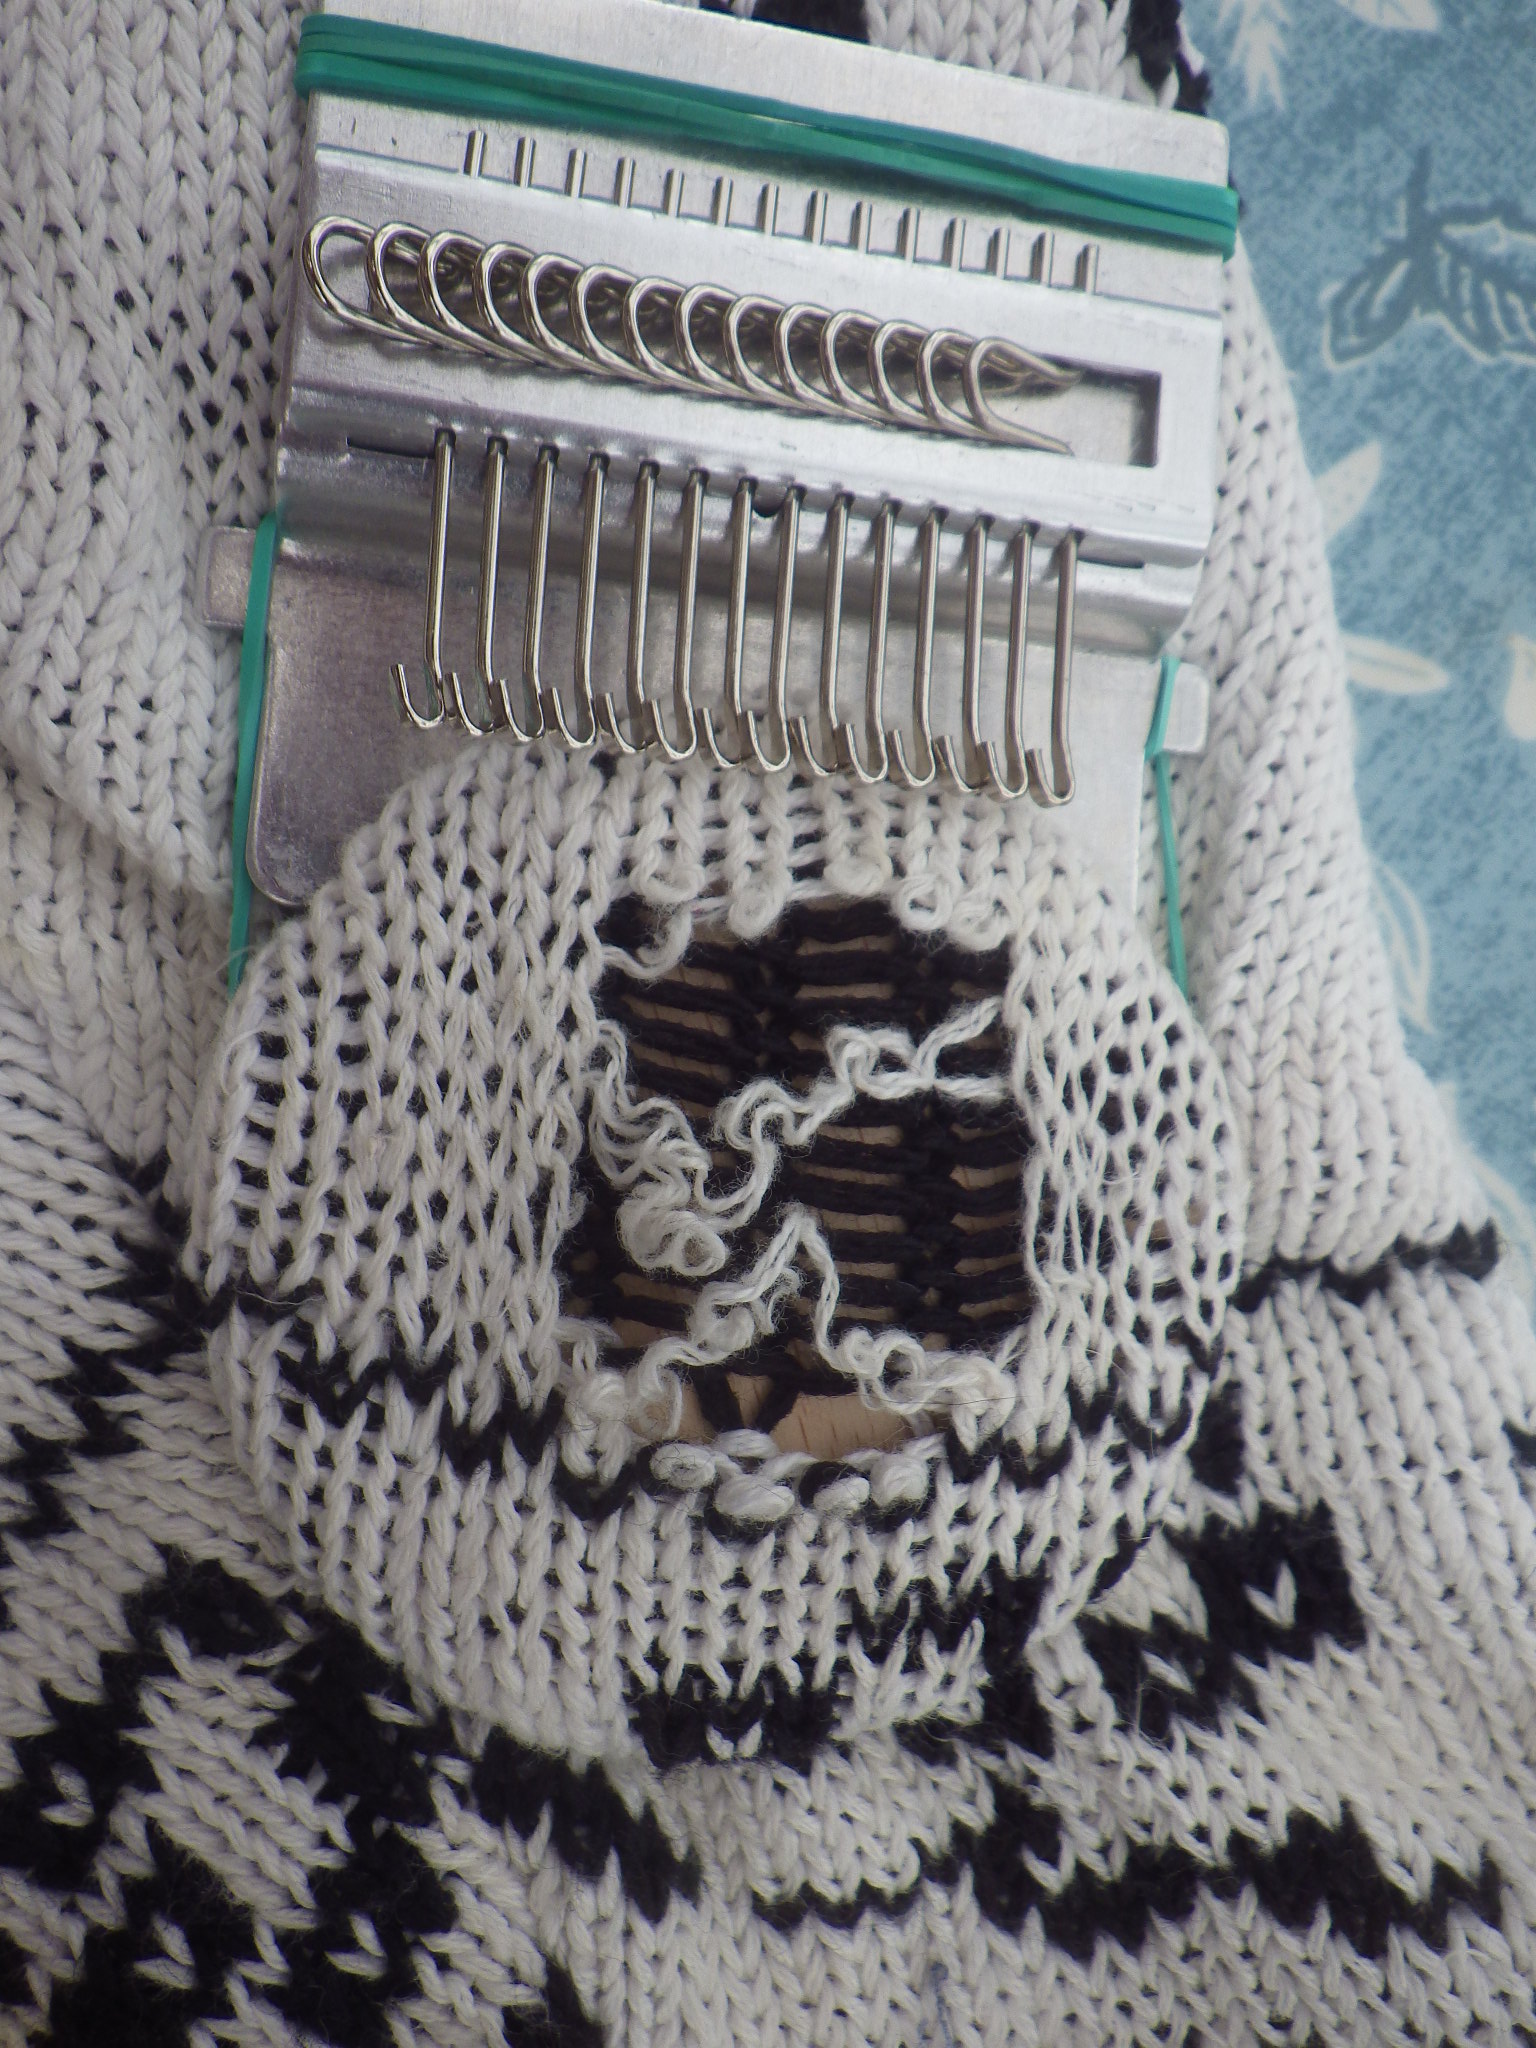

Once that’s done, the weft thread is attached at the bottom corner and, using a long needle, threaded through the warp threads alongside the hooks. The needle is then pushed down to the bottom of the mend (away from the hooks) and the thread pulled through. Before inserting the needle back in the other direction, the orientation of the hooks is reversed by running your thumb along the metal loops. This moves the lower threads up and the upper threads down, just like a full-sized loom. Before each pass of the needle the hooks are moved using the metal loops, so that when the thread passes back the woven fabric is created.


You keep working back and forth, reversing the hooks after each pass and anchoring the thread on each side, until the warp threads are completely used. After that, you release the elastic band holding the metal piece in place, remove the warp threads from the hooks and stitch that edge in place. Once that’s done, the wooden disk is removed and you have a very tidy bit of darning.


I have to confess that it took me a couple of attempts to get it right. Because of the stretchy nature of my cardigan I realised after my first unsuccessful try that it would be best if I stabilised the area with a few running stitches around the edge of the hole before attaching the disk. Once I had done this, it all went fairly smoothly. I think that the stitches at the side to secure the weaving could have been neater and I could have done a better job with the warp threads to begin with, but otherwise I’m happy. The yarn I selected is right at the thickest end of what can be used with this particular Speedweve model (there is a version with the hooks further apart for thicker yarn), but it was just right for this particular mend. The wool that came in the kit is thinner and might have been easier to use for my first attempt, but it just wasn’t right for this job.
Now I’ve got the hang of it, I think some rather more interesting weaving patterns might be on the cards.


Nice Piece of Work
/ August 16, 2021It looks great and sounds like you enjoyed it. You lost me at “wooden disk”, but I’m delighted to see your results.
LikeLiked by 2 people
The Snail of Happiness
/ August 16, 2021he he… I always have to do a thing before I really understand it; written descriptions are not enough for me either.
LikeLike
Wild Daffodil
/ August 16, 2021wow! what an amazing gadget
LikeLiked by 1 person
The Snail of Happiness
/ August 16, 2021It’s really lovely and now I understand how it works I can see it’s going to get lots of use.
LikeLike
nanacathy2
/ August 16, 2021What a gadget. Looks great fun.
LikeLike
The Snail of Happiness
/ August 16, 2021It is… I might get a bigger one to do bigger holes too.
LikeLike
Rainbow Junkie
/ August 16, 2021Produces a much neater effect that I get when I have done similar sorts of repairs in the past without the aid of such a tool. I like the idea of different weaving patterns, sounds fun. Look forward to seeing them.
LikeLike
The Snail of Happiness
/ August 16, 2021I can do a fairly neat freehand darn, but nothing this good and this will certainly facilitate the use of different colours to make a little plaid patch.
LikeLiked by 1 person
Going Batty in Wales
/ August 16, 2021I found a hole in one of my hand knitted socks this morning so I think I may be buying one of those gadgets. I have darned many things but find it hard to keep the threads evenly spaced so it always ends up looking a bit of a mess.
LikeLike
The Snail of Happiness
/ August 16, 2021It is the evenness that is the real benefit… although simply using the wooden part fixed with an elastic band would help make my freehand darning neater.
LikeLiked by 1 person
Going Batty in Wales
/ August 17, 2021I have been using a darning mushroom handed down from her mother-in-law but it has circular shallow grooves in the top and actually makes darning harder. I will persevere!
LikeLike
The Snail of Happiness
/ August 17, 2021You can have a go with it next time you visit… bring a sock!
LikeLiked by 1 person
Laurie Graves
/ August 16, 2021I, too, was lost at “wooden disk” but as we would say in Maine, that is some gadget.
LikeLike
The Snail of Happiness
/ August 16, 2021Just admire the end result!
LikeLiked by 1 person
katechiconi
/ August 16, 2021It’s interesting that the darn is almost a separate piece of ‘fabric’ that needs to be attached to the background… which makes perfect sense if you see the gadget as a loom.
LikeLike
The Snail of Happiness
/ August 16, 2021Yes, only the “bottom” is anchored to bein with; the sides get attached as the weft threads turn and the top has to be sewn at the end, which means the loom could be used to make tiny pockets!
LikeLiked by 1 person
tialys
/ August 17, 2021Wow! I feel as if I should rip a hole in a jumper just so I can try one out,
LikeLike
The Snail of Happiness
/ August 17, 2021Yes, I was very pleased to have something that actually needed mending right away!
LikeLike
DawnGillDesigns
/ August 17, 2021I am going to have to come back to this when i’m on the laptop, and feeling more technical, but it looks like a fab mend, and a girl can never have too many tools 😉
LikeLike
arlingwoman
/ August 17, 2021Wow. I want one of those things.
LikeLike
cedar51
/ August 21, 2021I probably couldn’t cope with it, not that I’ve found my own speedweve gadget, as I said last post – as my hands are too disabled for many of those kind of gadgets…but your result looks spectacular…
LikeLike